Toilet cistern guide

The toilets at The Precinct are made by Argent. This guide covers how to access the cistern, turn off the water supply in an emergency, and replace the inlet valve if it fails.

Common symptoms

If something's not right with your toilet, it usually shows up as one of three things:

1
The flushing mechanism appears not to work – you press the button and nothing much happens, or only a weak flush comes through.
2
The inlet valve appears to leak and the cistern (tank) never fills – you can hear water trickling but the tank stays empty, or fills painfully slowly.
3
Water leaks into the bowl – a constant trickle or hiss running down the back of the bowl long after the last flush.
Worth a quick look yourself first. Plumbers can be quite expensive, particularly on weekends or public holidays. In most cases the cause is the inlet valve diaphragm – a $30 part and a ten-minute job using the steps below.
Why it happens (and how to prevent it). The inlet filter and diaphragm tend to clog with debris stirred up after pump maintenance or a water outage. Next time the water is restored after an outage, run a tap in the bathroom for a minute or two before flushing the toilet – the debris flushes out of the tap rather than into the cistern.
Turning off the water supply

If your toilet is overflowing or leaking, do this first.

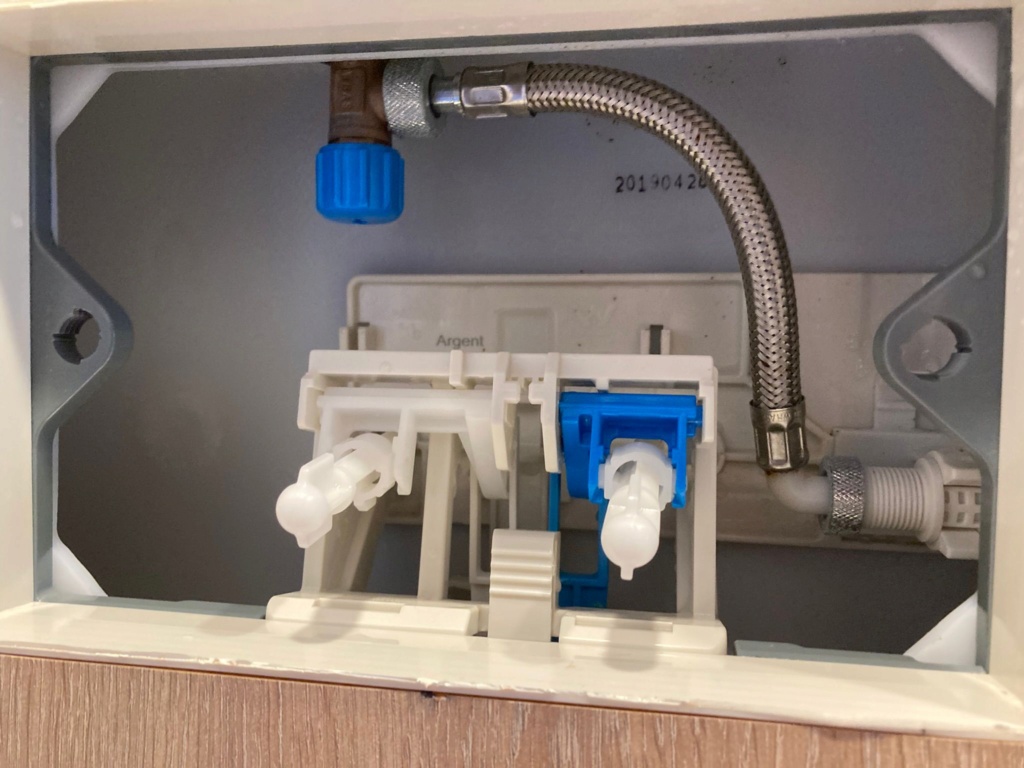
Toilet cistern interior showing blue isolation knob The cistern interior – the blue knob turns the water supply off
1
Remove the flush fascia – this is the silver panel on the front of the cistern. Lift the bottom of the panel out vertically, then pull it away from the wall.
2
Turn the blue knob to switch the water supply OFF. You'll see it clearly once the panel is off – it's the blue plastic knob shown in the photo above.

Replacing the inlet valve

The part that most commonly fails is the inlet and water level unit – not the flushing mechanism. At The Precinct this is the Argent B3220-D, which costs around $30 to replace.

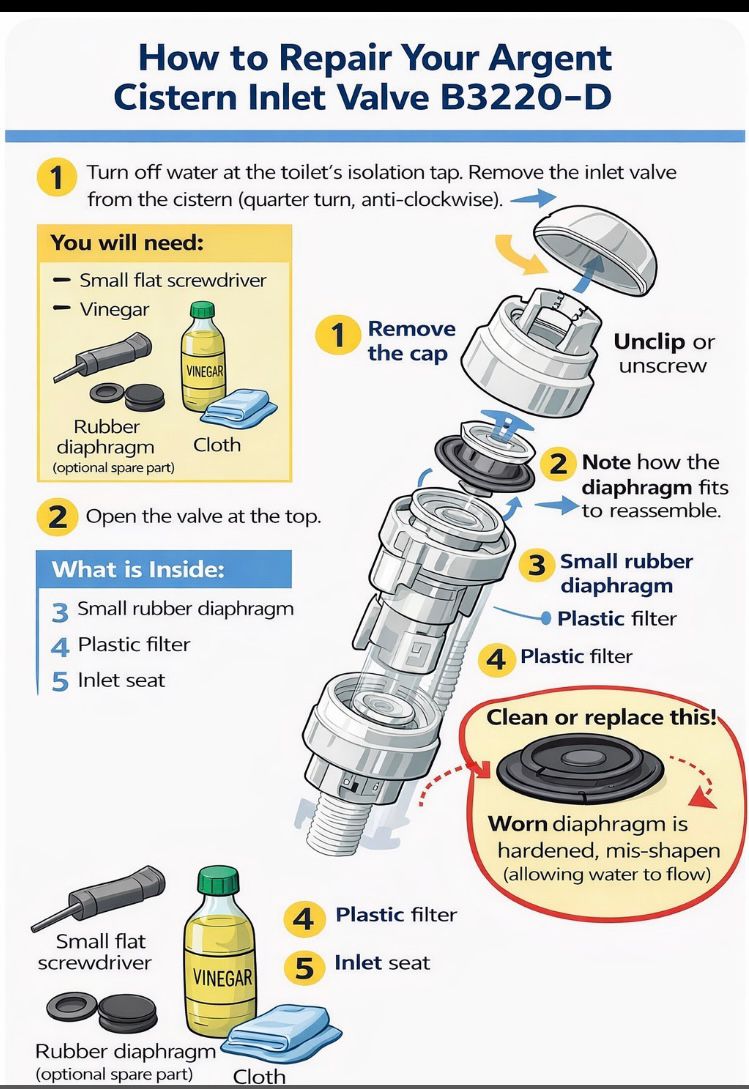
How to repair the Argent B3220-D cistern inlet valve Argent B3220-D repair diagram – clean or replace the rubber diaphragm
What you'll need: Small flat screwdriver · Vinegar · Cloth · Rubber diaphragm B3220-D (optional spare part)
1
Turn off the water supply using the blue knob as described above.
2
Remove the button mechanism – with the front fascia already off, disconnect the hose from the back of the button unit, release the single clip holding it in place, then lift it up and manoeuvre it out. This gives you proper access to the inlet valve inside the cistern.
3
Remove the inlet valve cap – unclip or unscrew it with a quarter turn anti-clockwise.
4
Note how the diaphragm fits before removing it, so you can reassemble correctly.
5
Remove and inspect the rubber diaphragm – if it's hardened or misshapen it needs replacing. If it looks okay, clean it and the plastic filter with vinegar and a cloth.
6
Reassemble in reverse order – refit the diaphragm and cap, slot the button mechanism back in and reconnect the hose, then turn the water back on.

Where to source part B3220-D

Last known local retailer Tuck Plumbing
08 9444 7988
Argent distributor info@argent.com.au
1300 364 748
Approximate part cost ~$30